macOS device Enrolling in Jamf management: what to expect
In order to improve the self-service and management performance of your school-issued Apple computer, CIT will be enrolling the computer in its new Apple device management platform, called Jamf. This article explains what that process entails, and provides a step-by-step walkthrough of what to expect when your automatic Jamf enrollment begins.
Before You Start
Jamf management is for campus-owned computers only. Any personal Apple devices you own will not be included in this enrollment.
Enrollment can take anywhere from 20-30 minutes, but you will be able to continue to use your computer during enrollment.
Your computer will not need to restart during enrollment. A VPN connection is not required if you are off campus during your scheduled date and time.
Please note that the manual portion of the enrollment (see Step 2 below) can take place any time after Step 1 begins.
If you would prefer to enroll your computer manually before your scheduled enrollment, please see the instructions at the bottom of this page.
Steps
Once the enrollment begins on the date and time indicated for your department by CIT, the following will happen, all automatically:
A pop-up window will appear indicating that initial setup and configuration has begun.
Once all settings are configured and applications are installed or upgraded, you will be notified that your Mac is now finished with initial setup and configuration. Click Finish to close the window.
To fully complete the enrollment, open System Preferences, then click Profiles. Highlight the MDM Profile in the list, then click the Approve button to finish enrollment.
Once Steps 1 and 2 have been completed, your Jamf enrollment is complete. You may close any remaining open windows and continue on with your day.

Manually beginning your Jamf enrollment
If you would rather complete the enrollment before your scheduled date, you can start the enrollment manually by installing a package that should already be cached on your computer.
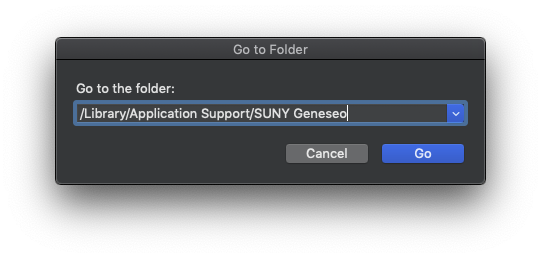
From your desktop, click Go, then Go to Folder. Enter the following file path (see screenshot below): /Library/Application Support/SUNY Geneseo
Double-click QuickAdd.pkg, then follow the on-screen prompts to install the Jamf enrollment profile
Once the installation begins, the enrollment should complete as outlined in Steps 1-3 above. That's it!
Notes
If you run into any issues following the instructions above, please submit a JIRA request and your department's TSP will follow up with you as soon as possible.